Using AWS Lambda and API Gateway as an HTML form endpoint
I recently built a system to accept comments on an otherwise static website. Since the site is static, I created a separate application to process the comments. This application is an AWS Lambda function. I use Amazon API Gateway to make the Lambda function accessible via HTTP.
In this post I show how to use Lambda and API Gateway to create an HTTP
endpoint that accepts POST requests with
application/x-www-form-urlencoded payloads (such as from HTML forms). The
function outputs HTML.
In particular, I demonstrate a simple method of passing a URL encoded body into a Lambda function.
While this is a step by step guide to building such a system, I also emphasize the reasons behind each step.
An HTML form
Let's start with an HTML form:
<form method="POST" action="http://127.0.0.1/endpoint">
    <input type="text" name="my-field" value="testing 1 2 3">
    <input type="submit" value="Submit form">
</form>
This form looks like this:

Clicking Submit form makes an HTTP request:
POST /endpoint HTTP/1.1
Host: 127.0.0.1
Content-Type: application/x-www-form-urlencoded
Content-Length: 22

my-field=testing+1+2+3
Typically an application receives the request for /endpoint and does
something with it, such as creating a record in a database, and responds
with HTML or a redirect.
In the case of a static site with only static assets, there is no application to dynamically react to the POST request.
Let's create a Lambda function to accept the request and react to it.
A simple Lambda function
Lambda is a service for running code on Amazon's servers. One of Lambda's main selling points is not having to manage any servers yourself. You upload code conforming to a particular interface, configure settings, and then your code runs without much of the usual maintenance. I'd say no maintenance, but you're still going to want to at least monitor it.
We call this paradigm serverless computing. Typically we refer to the piece of code as a function since the canonical example is piece of code for one purpose.
There are multiple ways to call Lambda functions. For example, you can configure them to run periodically in a way similar to cron. In our case, we will call the function in response to an HTTP request.
You can create Lambda functions in several programming languages. One of the natively supported languages is JavaScript running on Node.js. That's what we'll use here.
Here is the Lambda function we'll work with:
const AWS = require('aws-sdk');
const querystring = require('querystring');

// Set this to the region you upload the Lambda function to.
AWS.config.region = 'us-west-2';

exports.handler = function(evt, context, callback) {
    // Our raw request body will be in evt.body.
    const params = querystring.parse(evt.body);

    // Our field from the request.
    const my_field = params['my-field'];

    // Generate HTML.
    const html = `<!DOCTYPE html><p>You said: ` + my_field + `</p>`;

    // Return HTML as the result.
    callback(null, html);
};
This is the entirety of the code for the Lambda function. I'll explain what it does.
exports.handler is the entry point when we trigger the function.
The first parameter to the function is an Object called the event. I name
it evt. The event contains the input to the Lambda function.
We'll configure the incoming request so that the HTTP body is available on
evt's body property. In the case of our example form, evt.body is the
URL encoded string my-field=testing+1+2+3.
Using the Node.js querystring package (part of the Node.js standard
library), we parse the string into an object that looks like this:
{
    "my-field": "testing 1 2 3"
}
Next, the function makes a string called html containing a minimal HTML
document.
Lambda functions return results by passing a value as the second parameter
to the callback function (the first parameter is to indicate an error).
Lambda runs the value through
JSON.stringify()
to turn it into a JSON string.
This is the Lambda function's output:
"<!DOCTYPE html><p>You said: testing 1 2 3</p>"
This is a JSON string containing HTML. Before it reaches the HTTP client, we'll turn it into raw HTML. I demonstrate this when I talk about API Gateway.
Configuring the Lambda function
We've written our code. Now we want to put it on Amazon's servers.
Log into AWS and go to AWS Lambda. Once there, click Create a Lambda function:

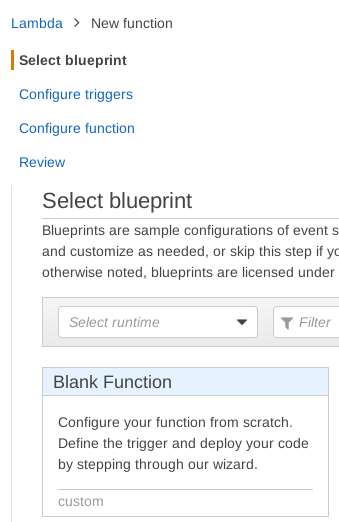
Choose Blank Function as the blueprint:
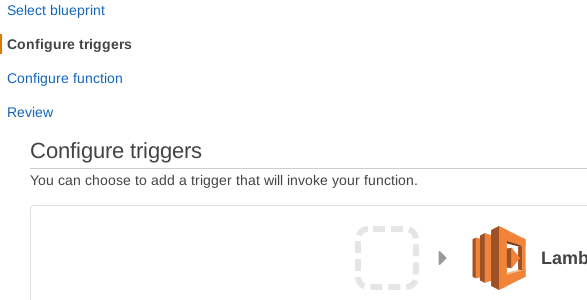
Don't configure any triggers. Click Next:
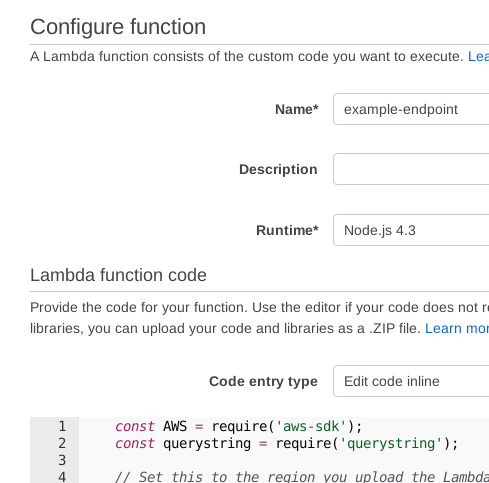
Enter a name, such as example-endpoint. Then paste in the code from the
prior section:
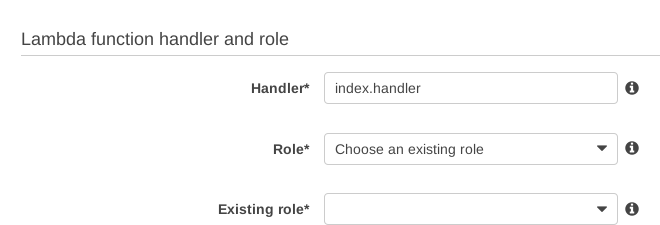
You must set a role for running the function. You can create one. Our function is simple enough that you don't need to give it any permissions:
You don't need to change anything else. Scroll down and hit Next. You'll be given a chance to review your settings. Hit Create function:

The Lambda function is ready to run. However, the outside world can't talk to it yet. We want HTTP requests to be able to call it. Let's set that up next.
Configuring API Gateway
API Gateway is a service that lets you define and host APIs. We can use it to create an HTTP endpoint sitting in front of our Lambda function. We'll configure it so that API Gateway receives an HTTP request, calls our Lambda function and retrieves its result, and then responds to the HTTP request using the Lambda function's result.
One of API Gateway's interesting features is the ability to alter requests and responses. You can change request headers/body before they reach the Lambda function, and change response headers/body before they reach the client.
In the last section we configured a Lambda function that expects its input as a JavaScript Object, and returns a JSON string. We'll use the API Gateway both to accept and respond to the HTTP request, as well as to transform the request/response.
Go into AWS and go to API Gateway. Click Create API:

Give the API a name, such as example-api. Then click Create API:

We want to make the Lambda function accessible by an HTTP POST request. To do that, click Actions and choose Create Method.
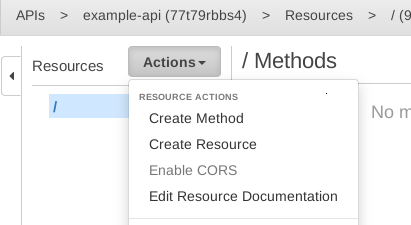
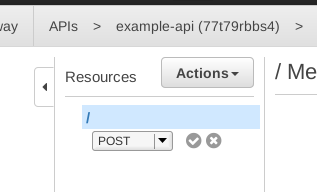
Then choose POST and click the checkmark:
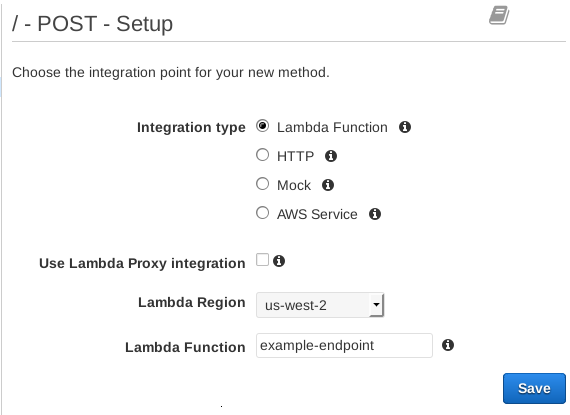
We now have to configure the method.
Set Lambda Region to the region you created your function in. Then enter the name you gave the function, and click Save:
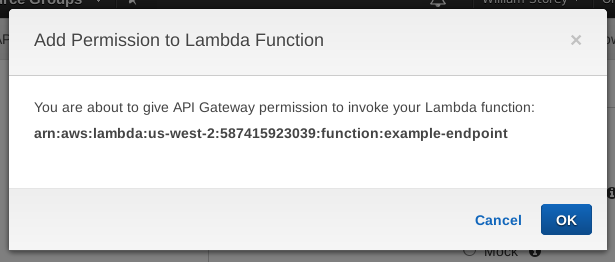
You'll be prompted to give permission to the API Gateway to run your function. Click OK:
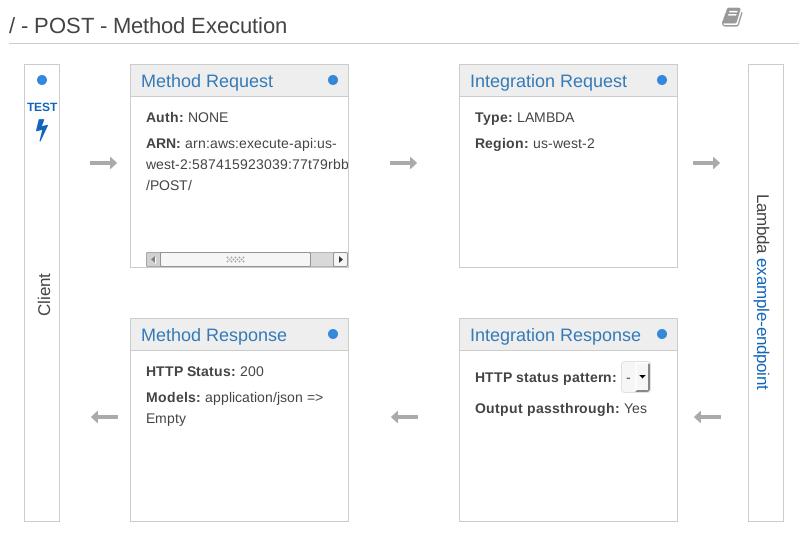
You will find yourself at a page describing the path the POST request and response take through API Gateway. We need to configure settings at three of the four steps.
Translating the request from application/x-www-form-urlencoded to JSON
The request comes in with a URL encoded body (Content-Type:
application/x-www-form-urlencoded). Lambda does not understand this.
Instead, Lambda expects input as JSON, and automatically converts that to
an Object which becomes the event parameter. We'll use a template to
translate the body into JSON. This translation occurs before the Lambda
function runs.
In the Integration Request section we can configure how API Gateway makes a request to its integration, our Lambda function.
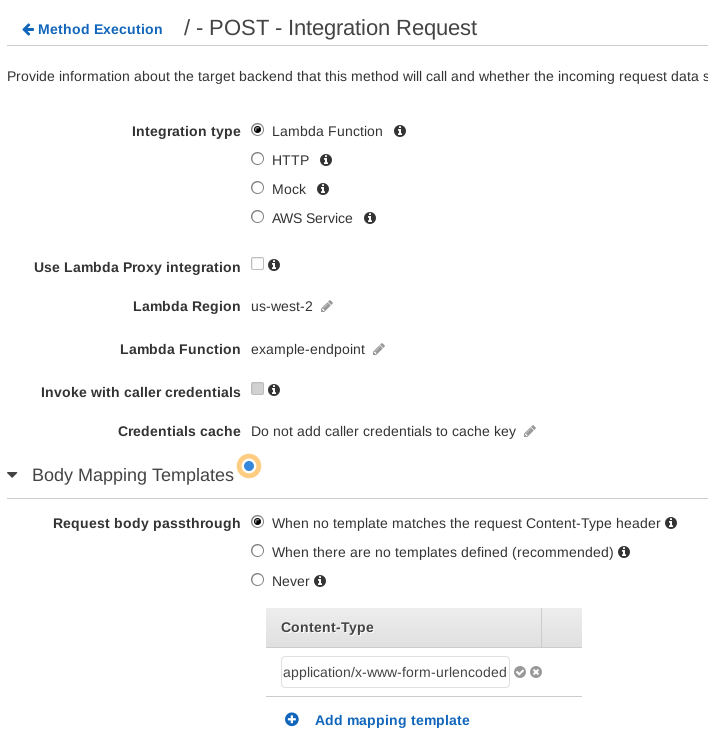
Go into Integration Request. Once there, expand Body Mapping Templates.
Click Add mapping template and enter application/x-www-form-urlencoded.
This lets us define a template to use for requests with this Content-Type:
Click the checkmark.
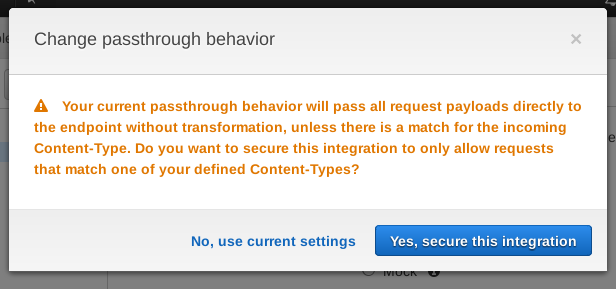
You'll be prompted to secure the integration. This means if a request comes in that does not match this Content-Type, reject it. Accept this:
Then you will see a template editor. Enter this template and click Save:
{
    "body": "$input.body"
}
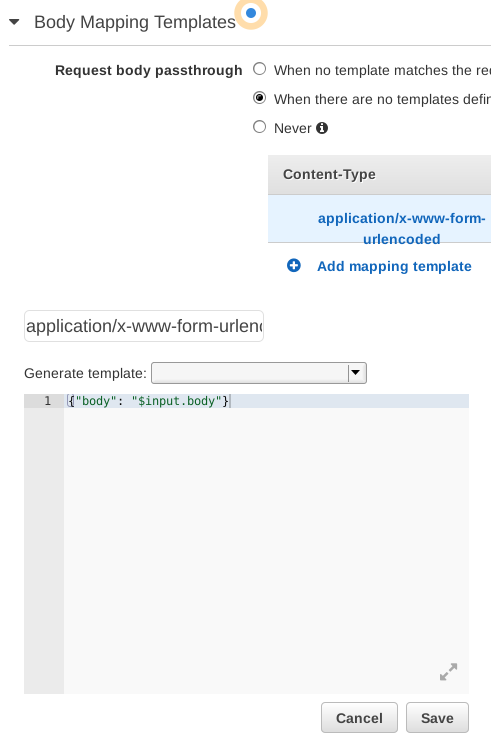
This template takes the raw request body, $input.body, and places it
inside a JSON object on the body property. This object is what the Lambda
function receives as its evt parameter. Note it's safe to wrap the body
in double quotes since a well formed URL encoded body encodes "
characters.
There are other fields you can use in this template. See the API Gateway documentation for more.
Add Content-Type header to the response
Next we configure the response sent to the client. We need to ensure we
send a Content-Type header. We'll use this header to tell clients that
the response is HTML.
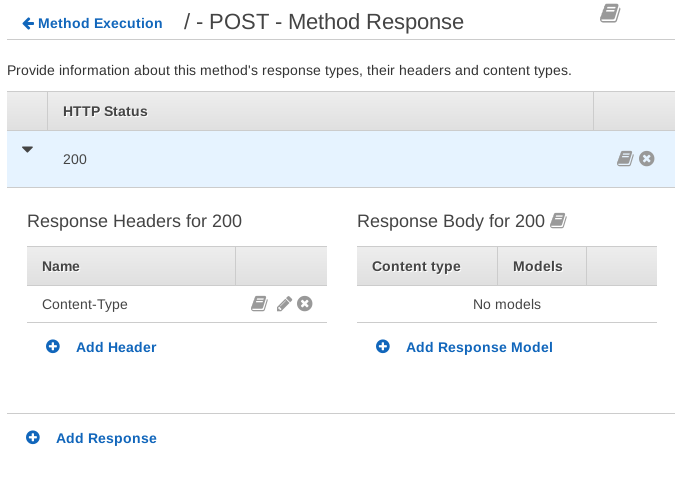
In the Method Response section we can configure how API Gateway sends responses to clients.
Go back to Method Execution and go to Method Response. Expand HTTP Status 200:
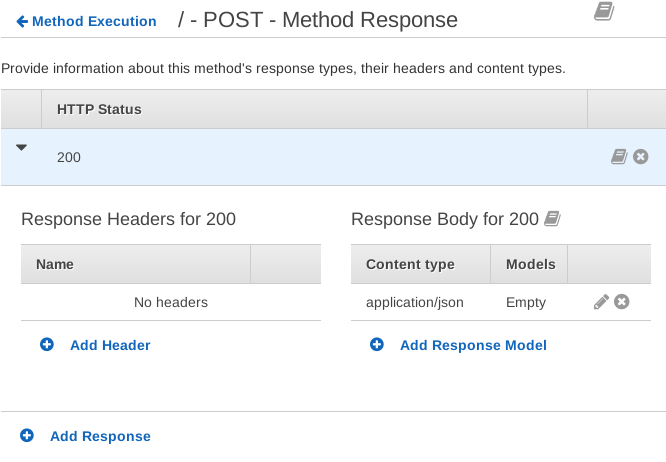
Click Add Header and enter Content-Type. This means the response will
include this header.
Remove application/json from under Response Body. We're not sending back
JSON.
Translating the response from a JSON string to HTML
The response comes back from the Lambda function as a JSON string. Browsers won't recognize this string as HTML, so we need to translate it.
We'll set the Content-Type header we send to text/html. Then we'll set a
template to translate the JSON string (containing HTML) response into plain
HTML.
The Integration Response section lets us configure how we receive the response from the integration, our Lambda function.
Go back to Method Execution. This time go into Integration Response.
Expand Method response status 200, Header mappings, and Body Mapping Templates:
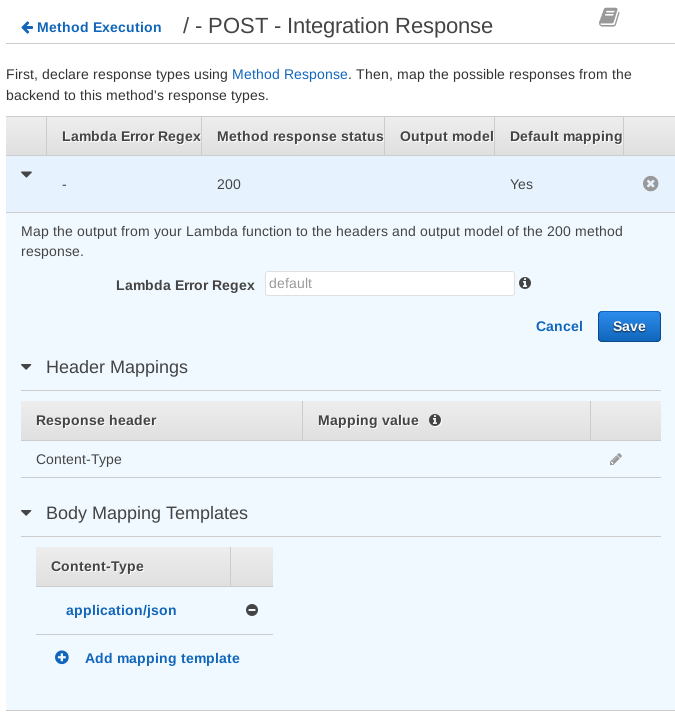
Under Header Mappings click the edit button beside Content-Type.
Enter 'text/html' (the single quotes must be there) and click the
checkmark:

Under Body Mapping Templates, remove application/json.
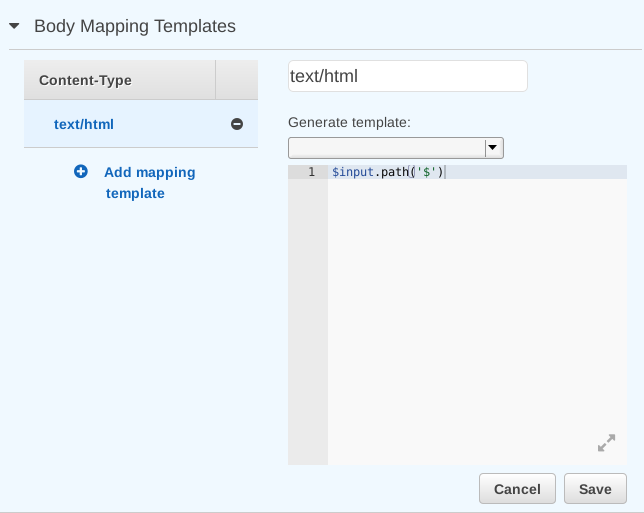
Click Add mapping template and enter text/html. This tells API Gateway to
send a particular template when sending text/html. Enter this into the
template editor:
$input.path('$')
Then click Save:
How does this template work?
Recall that our response from our function is a JSON string.
$input.path() takes as its parameter a
JSONPath expression. Using $ as
the parameter means to access the root object. In our case, the root object
is a string. This means the value of the template becomes the value of the
string, which is HTML.
If we did not have this template mapping, then the response body would go through containing the JSON encoded string, double quotes and all. Our template decodes the string from JSON and then writes it out.
Deploying the API
We're done configuring the API. Now we need to create a URL we can access.
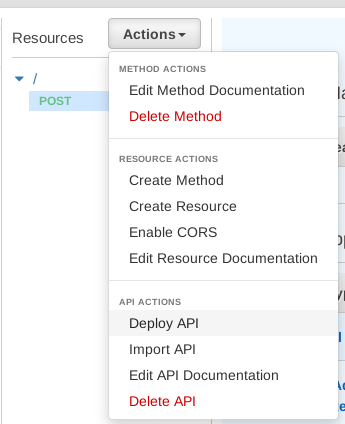
Click Actions and then Deploy API:
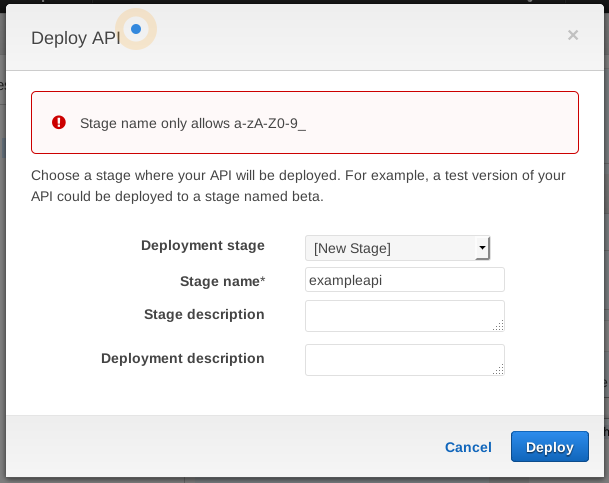
You'll be prompted to choose a Deployment stage. You can create a new one.
Name it something like exampleapi. This name is part of the URL.
Click Deploy:
You'll then see the URL to your API:

We can now make HTTP POST requests to this URL to reach our Lambda function!
Note if you change anything in your API you need to deploy the API again.
Testing our request
Let's try it out!
You can do this using cURL (take the URL from the prior step):
curl -d 'my-field=testing+hi+there' \
  https://77t79rbbs4.execute-api.us-west-2.amazonaws.com/exampleapi
You should see this:
<!DOCTYPE html><p>You said: testing hi there</p>
You can also create an HTML form with the URL as its action attribute and
make the request that way.
Wrapping up
There are a lot of possibilities with serverless functions. Using them as an endpoint for HTTP POST requests from forms is one powerful use, as is being able to output HTML.
I like the serverless concept quite a lot. While I'm capable of running and managing servers, there's an overhead in doing so. Services like Lambda and GCP App Engine mean I can focus more on code rather than on managing servers.
One aspect that is not hugely attractive is doing so much configuration through a web interface. It is time consuming and easy to forget to do something if you are setting up several services. However, there are alternatives. You can configure AWS services through a CLI, an SDK, or APIs, such as this one for API Gateway. These allow for automation and a more declarative approach compared with clicking through GUIs. An interesting project addressing this problem is Terraform.
Further reading
This post by Kenn Brodhagen helped me figure out the HTML output part.
API Gateway Template Reference
Wikipedia page about serverless computing
Tags: serverless, aws, lambda, cloud, api, programming